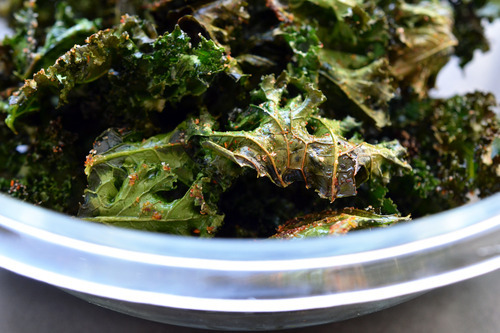
Baked Kale Chips by Nom Nom Paleo
This an incredible and healthy snack you can prepare any time, but it has it's proper way to cook. We thought the recipe of Nom Nom Paleo was perfect.
Source: http://nomnompaleo.com/post/2648091289/baked-kale-chips
To make kale chips, however, there are a few key points to keep in mind:
- The kale leaves must be SUPER DRY.
- Bake the kale at 350°F.
- Cook the chips for 12 minutes.
- Salt AFTER the kale chips are out of the oven.
Here’s what you need to make your own chips:
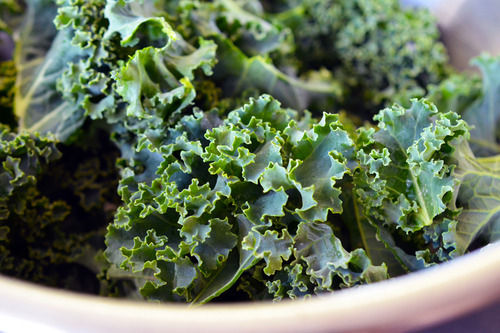
- 2 bunches of kale
- 1-2 tablespoons of avocado oil
- fleur de sel or your favorite seasoning salt
Here’s what to do:
Preheat the oven to 350°F. Then, remove the leaves from the stems and wash the leaves well in a few changes of water. (The stuff I buy from the farmer’s market is often dirty. I don’t know about you, but I find that chips taste better sans dirt.)
Then, in small batches, spin the leaves dry in a salad spinner.
Toss the dry leaves with avocado oil and use your hands to distribute the oil evenly.


Then, line a baking sheet with parchment paper and lay some of the leaves on top in a single layer.
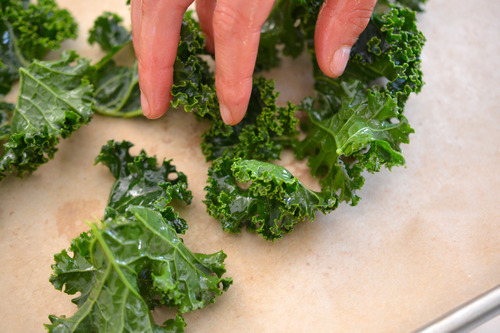
Make sure the leaves are all flat and not folded over or they won’t crisp properly.

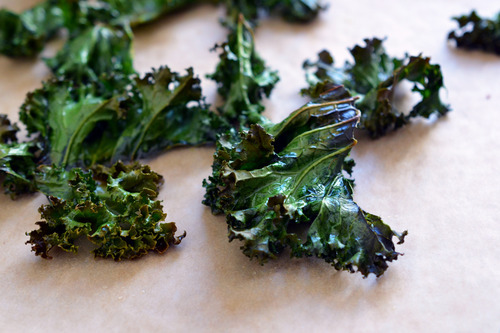
Pop the tray in the oven, and…

…after just 12 minutes, the chips’ll be done! (Set your timer and keep an eye on the kale, ‘cause if the chips burns, they’ll be bitter – and so will you.)
Once the kale’s out of the oven, season the chips with some fleur de sel or your favorite seasoning salt.
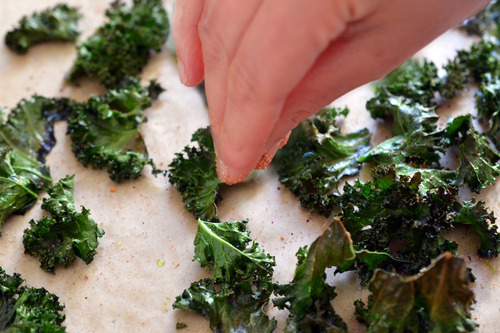
Eat 'em up!
Healthy dinner ideas
We know that cooking at night after work sometimes is difficult and people prefer something quickly and easy. We found this healthy dinners that you can cook in 40 minutes or less.

Poached Ginger Chicken
Poach chicken breasts in a flavorful ginger, shallot and sesame broth for a delicately flavored main dish.
Shrimp and Snow Pea Salad
Ellie uses pre-cooked shrimp to make this Asian-inspired salad super-fast. Make a quick sesame dressing, then add in radishes, scallions and fresh, crisp snow peas.

Chicken and Asparagus Crepes
Fill store-bought crepes with shredded rotisserie chicken, ricotta cheese and herbs. Top with fresh asparagus and a light, lemony sauce.
Tofu, Noodles and Asian Greens
Whip up a bowl of warming Asian soup in less than 20 minutes with greens, tofu and udon noodles.
Organizing your Kitchen
We think that the kitchen organization is really important for you to feel good so you can cook better! So we thought this article from Martha's Stewart page had good ideas to make your kitchen look more organized.
Hope you like it!
Source: http://www.marthastewart.com/275482/kitchen-organizing-tips/@center/277007/kitchen-design

Clear up the clutter and make the most of your countertops by using a cake stand to hold olive oil, salt, pepper, and other frequently used seasonings. The stand makes it easy to find and use these ingredients while you cook, and gives you space to arrange other herbs and spices around the base of the pedestal.

Keep pantry staples organized with a set of glass storage jars customized with etched lettering.4

You don't need a prairie-size kitchen to manage the chaos of pot storage. A handrail and several S-hooks will turn a few square feet of wall into a convenient rack for kitchenware. Handrails are better than towel bars for the job, because they support more weight. Look for them, in sizes from 12 to 32 inches long, at surgical-supply stores. As for the pots and pans, you already know which cabinet door hides an avalanche of those.

Metal baskets once used for milk bottles and other groceries make perfect storage units for the kitchen. For maximum impact, choose similar containers, but vary their sizes and shapes (the metal ones here feature punched holes and wire grids). Line baskets with canvas, and group them together to organize an entire roomful of odds and ends.
Turkey recipe for thanksgiving
Are you ready to cook a turkey for thanksgiving? We found this recipe of an Easy Herb-Roasted Thanksgiving Turkey that we thought you would like.
Source: http://www.popsugar.com/food/Easy-Herb-Roasted-Thanksgiving-Turkey-Recipe-25926662?ref=38533780
If you have extra time, let the turkey sit at room temperature for an hour after it's been prepped; this will allow some of the salt and aromatics to infuse the flesh.

INGREDIENTS
12- to 14-pound turkey, rinsed and patted dry, neck and gibletsreserved for stock
2 tablespoons minced garlic (from about 6-8 cloves)
1 tablespoon plus 1 teaspoon dry mustard
2 tablespoons minced fresh rosemary, plus whole sprigs for the cavity
2 tablespoons minced fresh sage, plus whole sprigs for the cavity
2 teaspoons minced fresh thyme, plus whole sprigs for the cavity
2 tablespoons kosher salt
2 teaspoons freshly cracked black pepper
4 tablespoons olive oil
4 tablespoons freshly squeezed lemon juice, plus 1 lemon, quartered for the cavity
DIRECTIONS
- Preheat the oven to 400°F. Line the v-rack of a roasting pan with heavy-duty tinfoil, and use a paring knife to poke holes in it every inch or so (this will protect the turkey from sticking to the rack, while allowing the drippings to accumulate on the bottom of the pan).
- Whisk together all ingredients (except the turkey, herb sprigs, and quartered lemon) in a small mixing bowl.
- Remove any remaining feathers from the turkey with tweezers. Gently loosen the skin from the flesh on the breasts, thighs, and drumsticks, and spread slightly more than 1/3 of the herb paste under the skin directly onto the flesh of these parts.
- Spread a scant 1/3 of the herb paste in the cavity of the turkey, and the remaining herb paste on the skin, focusing on the wings (since these aren't seasoned yet).
- Place turkey, breast-side down on the prepped v-rack and add 1-1/2 cups water to the bottom of the pan (this will prevent the drippings from burning). Stuff the cavity with the whole herb sprigs and quartered lemon.
- Roast for 45 minutes, then using clean oven mitts, or a wad of paper towels, flip the turkey so that the breast-side is facing up, and return to the oven.
- Roast for an additional 50 to 60 minutes, or until the thickest part of the thigh registers 170-175°, and the thickest part of the breast is 160°.
- Remove the turkey to a carving board, and let rest 30 minutes before carving.
Healthy Breakfast Snacks for Mornings on the Run
We know that when you are on the run it is difficult to cook breakfast and even worse to eat healthy! That’s why we found these Healthy Breakfast Snacks for Mornings on the Run.
Source: http://greatist.com/healthy-breakfast-snacks
Peanut Butter Banana Smoothie
Smoothies are a perfect on-the-go snack any time of day. Blend 1 frozen banana, 2 tablespoons natural peanut butter, 1 cup soy or almond milk (which keep longer out of the fridge than regular milk), and a few ice cubes. (Add a scoop of your favorite chocolate or vanilla protein for an extra protein boost.) If this is a morning snack, keep it in a tight-sealing container and throw it in a gym or work bag. For an afternoon boost, prep it the night before and freeze, remove in the morning, and it will be thawed and ready to enjoy after lunch.
Egg Muffins
Finally, a muffin without all the carbs. Plus, these guys are simple to make. Beat 10 eggs, ¼ cup chopped onion, 3 handfuls of spinach, 1 shredded zucchini, ½ a bell pepper (chopped), 4 slices cooked bacon or ham, chopped, and a sprinkle of salt and pepper. Divide egg mixture evenly in a lightly-greased muffin tin, and bake for 20-25 minutes at 350 degrees. Zap it for a few seconds in the microwave before serving.
Fruit and Yogurt Parfait
One of the easiest, healthiest, and tastiest snacks (or breakfasts) out there is a classic fruit and yogurt parfait. The best part? It can really be made with any toppings you like. Try choosing fruits that are in season locally for the most flavorful options (try our stone fruit saladfor summer, and opt for apples come fall).
Zapped Scrambled Eggs With Veggies
Yes, it’s possible to make really good scrambled eggs in the microwave. And it’s easy! Beat 2 eggs, throw in a microwave-safe container, add 1 handful of your favorite veggies (cherry tomatoes and spinach leaves work well), and a sprinkle of cheese. Zap the mixture for 30 seconds, stir, and cook another 30 seconds, or until eggs are solid. Throw a top on the container to eat later, or store the raw mixture in a fridge until ready to heat and eat.
Homemade Instant Oatmeal
For anyone with a microwave or hot water at their disposal, these customized instant oatmeal packets are fantastic to have on hand. Instead of purchasing pre-made oatmeal packets, assemble your ownin ziplock baggies using whole rolled oats, cinnamon, and mix-ins like raisins and nuts.
Kitchen Organization with S-Hooks
We’re always looking for new ways to take kitchen storage to the next level. And while additional shelving accomplishes a lot, there are few storage methods we like better than S-hooks.
S-hooks are the ideal storage solution for your home. Though they’re most commonly used in the kitchen, their multi-purpose functionality makes them an excellent choice for the garage, bathroom, closet, and more. Just be creative. If you have anything that can be easily hung up, there’s a good chance that S-hooks are a great solution.
Below we talk a little more about S-hooks. We touch on what exactly they are, how they’re used, and their many benefits. If you’re unsure of whether S-hooks are the storage solution for you, we encourage you to continue reading below. We have a strong feeling you’ll like S-hooks just as much as we do once you know a little more about them.
What Are S-Hooks?
The name says it all. S-hooks are simply S-shaped hooks used for hanging storage. One end of the S goes around a support rod. The other end of the S is used to hang items from.
S-hooks are made from all different materials. They also come in all shapes and sizes. However, stainless steel is quickly becoming the most popular material used for S-hooks. The reasons for this are numerous. Yet they all boil down to the strength, durability, appearance, and affordability of stainless steel S-hooks.
So what type of items can you store using hanging S-hooks? Let’s head into the kitchen to answer that question. While S-hooks can be effectively used anywhere in your house, they’re most commonly found in kitchens. In fact, using S-hooks in your kitchen will make yours look less like a home kitchen and more like a professional chef’s kitchen.
S-hooks allow you to organize your kitchen like a professional. They’re the perfect place to keep pots and pans when they’re not in use. Simply slip the end of the S-hook through the storage hole in the handle and you’re good to go. Other popular kitchen tools with hanging loops can easily and attractively be stored with S-hooks.
Storing your most commonly used kitchen tools with S-hooks makes them easier to access. They put everything within an arm’s length at all times. When you’re working on a time intensive meal, you won’t have to remember where you put that utensil. You’ll know exactly where it’s.
But don’t limit yourself to simply storing pots, pans, and utensils on your S-hooks. You can also use them for towels or dish drying racks. That’s one of their highlights. They’re versatile. They give you an incredible amount of flexibility. And, in the kitchen, that means more control.
Along these same lines, don’t limit your use of S-hooks to the kitchen. They’re the perfect storage solution for your garage or closet. Like in the kitchen, they help minimize clutter in these locations.
An example of an S-hook application for the closet is hanging and organizing scarves, neckties, or hats. An example for the garage is hanging up all your important tools.
Benefits of S-Hooks
The benefits of S-hooks are nearly limitless. Because of their flexibility and because they can be used for all different applications, everyone will find their own S-hook advantages. We discuss a few of the top benefits below.
- Versatility – Like we’ve mentioned time and time again, S-hooks are versatile. You can successfully use them in just about any room in your house. They’re even perfect for the garage or shed!
- Adjustability – If you use your S-hooks alongside a storage rod or wire shelving, you’ll find that they’re easily adjustable. You can slide them back and forth to allow room for larger hanging items. You can also add more or less of them to the rod at any time.
- Clutter-Control – S-hooks help minimize clutter like no other. Think about how difficult it is to find a specific kitchen utensil in a crowded drawer. When your most important utensils are all hanging side by side, it makes it easy to find that utensil on the fly.
- Appearance – A lot of storage solutions look tacky. Not so with S-hooks! In fact, stainless steel S-hooks look pretty good. They immediately give a professional look to any kitchen they’re used in.
- Easy to Clean – S-hooks are very easy to clean. All that it takes is a quick wipe down. If yours are stainless steel, opt for a microfiber cloth.
- Affordability – You don’t have to dish out big money for S-hooks. The majority range from about $0.10 to $3.00 apiece. And their affordability skyrockets when you consider the fact that they last forever.
Using and Caring for S-Hooks
One of the best things about S-hooks is that they’re so simple. This makes them easy to use and care for.
You’ll be able to set up your S-hooks in seconds. All you need to do is slip one end of the S over your storage rod or wire rack. The other end is used for hanging pots, pans, utensils, and other items. Because S-hooks are often made of stainless steel, they’re extremely durable. This allows you to hang heavy items from them without fear of them falling or becoming damaged.
Caring for your S-hooks is easy. Once again, their stainless steel construction makes them stand up tough against wear and tear. They can take a beating. All they really need is the occasional wiping down with a cloth. Using a microfiber cloth will ensure that the heavy-duty stainless steel shines for years to come.
Why You Need S-Hooks
Anyone and everyone can benefit from S-hooks. They add a simple, streamlined storage solution to every home.
The most popular place to use S-hooks is the kitchen. Use them here to hang pots, pans, and utensils. In addition to the easy storage, hanging these tools in this manner makes your kitchen look professional. We’re sure you’ll be convinced on the greatness of S-hooks if you just give them a try.
And that’s what the benefits of S-hooks really boil down to. They’re so cheap and easy to use that there really is no reason not to test them out. We’re sure you’ll be just impressed by their performance, versatility, and quality as we are.
The Microfiber Miracle Polishing Cloth
Cleaning just got a whole lot better with microfiber polishing cloths. Though they’ve been around since the late 1950s, it’s only within the last decade or so that they’ve really exploded in popularity in North America.
In fact, microfiber is often hailed as one of the most important cleaning technologies to emerge in the past century. In many ways, it’s thrown the cleaning industry upside down.
The United States has long relied on chemical cleaners and disposable products for domestic cleaning. Yet microfiber cloths greatly reduce the need for chemical cleaners. They’re also reusable, limiting your contribution to the country’s stream of waste.
But that’s not all to love about microfiber. In addition to their environmental friendliness, microfiber cloths also clean a vast variety of surfaces incredibly well. These range from kitchen surfaces to bathroom surfaces to glass windows to automobiles.
Perhaps the area where microfiber shines most brightly is on stainless steel appliances and stainless steel countertops. If you have a stainless steel kitchen, you’ll be amazed at just how well microfiber works. It cleans nearly any and all stains. It even cleans difficult-to-remove fatty stains (like fingerprints) without skipping a beat. And it does all this without leaving behind any sort of residue.
So why aren’t microfiber polishing cloths even more popular? The answer to this goes full circle back to the North American chemical market. Dominated by companies that make millions of dollars per year selling household cleaners stuffed with chemicals, the industry doesn’t take all too kindly to environmentally friendly alternatives.
While the majority of these companies have been slow to get behind a product that undermines their more expensive offerings, a number of companies have cropped up that put both the environment and your family’s health first. One way they are doing this is by marketing and selling microfiber cloths.
Sounds pretty great doesn’t it? Believe us, it is. But don’t take only our word for it. Read on below for more information on what microfiber is, the benefits of microfiber, and how you can use microfiber to keep your home spick and span.
What Is Microfiber?
Microfiber is a very fine synthetic fiber first developed in the late 1950s. However, finding applications for it was difficult. Add in the fact that the fine threads required for microfiber were difficult to produce and it’s easy to see why microfiber took so long to catch on.
Though it had some initial success in Japan during the 1970s, it wasn’t until the 1990s that microfiber begin to spread around the world. It became something of a craze in Sweden to clean with the fabric in the early 1990s and soon the same could be said for the rest of Europe. As we mentioned above, microfiber cleaning cloths have only become popular in the United States and Canada over the course of the past decade.
Microfiber is a densely constructed material made of polyester and nylon fibers. Each fiber is approximately 1/16th the thickness of a human hair. These fibers are woven together to create a net-like surface. The surface area contains millions of very small spaces capable of catching moisture, dirt, and debris of all kinds.
When you run a microfiber cloth over a surface like stainless steel, these small spaces pick up even the tiniest specks of dirt. Because microfiber uses nylon in its construction, it also creates a small static charge while in use. This attracts even more dirt by pulling it into the cloth. The dirt is then trapped until the microfiber cloth is washed.
Benefits of Microfiber Cloths
Though microfiber is used in various cleaning applications (including mop heads), microfiber polishing cloths are perhaps the most beneficial. We look at a few of the most important benefits of microfiber cloths below:
- Versatile – Microfiber cloths are versatile. They can be used on a number of surfaces, most notably as a cleaner for stainless steel. Pair your cloth with marble polishing powder to give your countertops an expert shine. Because they are lint-free and non-abrasive, they can even be used on windows and other glass applications
- Safe – Microfiber cloths don’t require harsh chemicals to be effective. They don’t even require the use of soap. This makes them very safe for you and your family. They are also hypoallergenic, making them the perfect choice for those with allergies or asthma.
- Environmentally Friendly – Because microfiber cloths don’t require chemicals, they are high among the most environmentally friendly cleaning products. All you need to use is water. You can also reuse microfiber cloths hundreds of times.
- Effective – Use only water with your microfiber cloth and you’ll remove 98.9% of bacteria from smooth surfaces. Compare this to the 92% that a conventional cloth used with bleach removes.
- Affordable – Sure, microfiber cloths are slightly more expensive than their conventional counterparts upfront. But add in the fact that they can be used hundreds and hundreds of time and their affordability quickly becomes apparent.
Using and Caring for Microfiber
Whether you’re using yours as an oven cleaner, stainless steel cleaner, window cleaner, marble counter cleaner, or lens wipe, microfiber cloths are incredibly easy to use.
All you have to do is get your microfiber cloth damp with warm water and wipe. You don’t even need to use soap or a chemical cleaner. Just dampen the cloth and you’re good to go. You’ll remove 98.9% of bacteria with every swipe.
Caring for microfiber is just as easy as using it. However, it’s important to note that it must be cleaned carefully. You should not wash your cloth in temperatures over 200 degrees. While most detergents can be used, you shouldn’t use bleach or fabric softener. Do not dry your microfiber cloth at a temperature over 140 degrees.
Why You Need a Microfiber Cloth
Microfiber cloths are a great investment. You can find them in packs of one, three, and six. This makes it easy to use yours for multiple different applications around the house.
When it all boils down to it, microfiber is effective, safe, environmentally friendly, and affordable. They last nearly forever and barely lose their cleaning power. You can’t go wrong with a microfiber cloth (or a whole set) if keeping your house clean without chemicals is a top priority.
© 2024 Pro Chef Kitchen Tools. All Rights Reserved